
Web
and Book design,
Copyright, Kellscraft Studio 1999-2016 (Return to Web Text-ures) |
 (HOME)
|
| ANOTHER
STYLE OF MISSION CHAIR The material necessary to make a mission chair as shown in the accompanying illustration may be secured from a planing mill with all four surfaces squared and sandpapered. The mill can do this work quickly and the expense will be nothing compared with the time it takes to do the work by hand. The following is the stock list: 4
legs, 2 1/2 by 2 1/2 by 32 1/2 in.
2 bottom end rails 7/8 by 5 3/4 by 23 1/2 in. 2 bottom side rails 7/8 by 5 3/4 by 28 1/2 in. 2 top end rails 7/8 by 4 1/2 by 23 1/2 in. 1 top back rail 7/8 by 4 1/2 by 28 1/2 in. 2 cleats 7/8 by 2 1/2 by 26 1/2 in. 7 slats 1/2 by 2 by 24 in. This design was purposely made simple. If it is considered too severe and the worker has had some experience in woodwork, it can easily be modified by adding vertical slats in back and sides. These should be made of 1/2 in. stock and their ends should be "let into" the rails by means of mortises. Either plain red oak or quarter-sawed white oak will do. Begin by squaring up one end of each leg, marking and cutting them to length and planing up the second ends so that they shall be square. Both the top and bottom of each leg should be beveled or rounded off about 1/4 in. so that they may not splinter or cause injury to the hand. When all of the legs have been made of the same length, set them on end in the positions they are to have relative to one another and mark with pencil the approximate locations of the mortises. Next, place them on the bench, side by side, even the ends and square sharp lines across to indicate the ends of the mortises. The drawing shows the dimensions to use. A sharp pencil should be used for this marking and the lines should be carried entirely across the two faces of each piece. 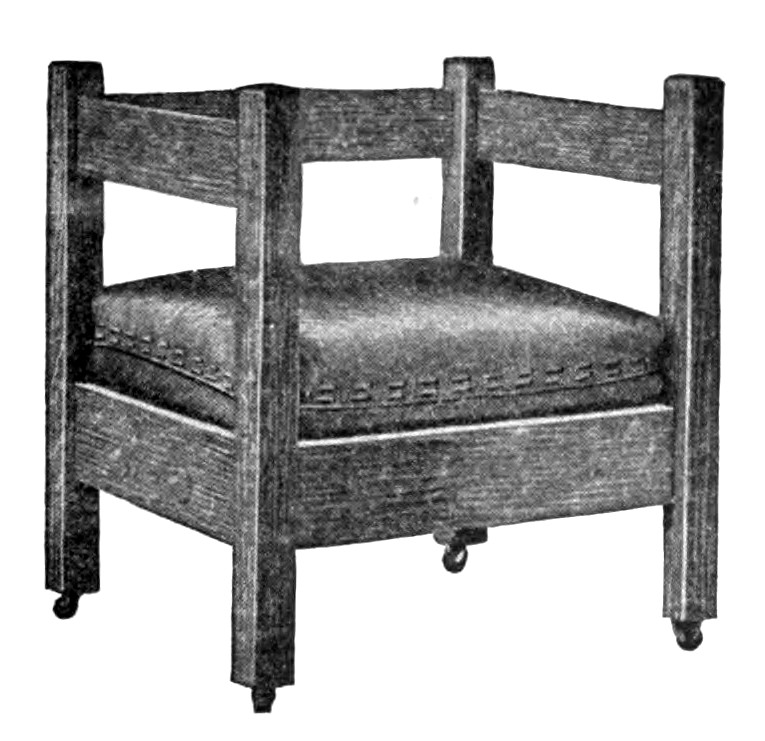 Mission Chair Complete Set the gauge for the side of the mortise nearest the face edge. With this setting, mark all the mortises, then set for the second side of the mortise and complete the gauging. There are two ways of cutting small mortises in common use. One is by using a chisel of a width just equal to that of the mortise. The other is by using a smaller chisel after the mortise has first been bored with the brace and bit. In the first method the cutting is begun at the middle of the mortise where a V-shaped opening is made the full depth of the mortise that is to be. Continuing from the middle, vertical cuts are taken first toward one end and then toward the other. The chips are pried out as the cutting proceeds. In making the last cut this prying must be omitted, otherwise the edge of the mortise would be ruined. It will be necessary to stand so as to look along the opening in order to get the sides plumb. This method of cutting, When once the "knack" has been attained, will be found much easier, quicker and more accurate for small openings, such as these, than the usual method. The second method, which is the usual one, needs no description. The rails should next have the tenons cut on their ends. It may not be out of plate to remind the amateur that the lengths of the various like pieces can best be laid off by placing them on the bench, measuring off the proper distances on one of them and then with trysquare marking across the edges of all of them at once. This not only saves time in that but one set of measurements need be made, but it insures all the pieces being similarly laid off. In measuring off for the shoulders of the tenons, begin at the middle of the length of the rail and measure half of the distance each way. By doing so, if there are any slight differences in the lengths of the pieces this difference will be divided between the two tenons and no harm will be done. In gauging the tenons take the precaution to mark a working face and joint edge, even if all the surfaces were finish-planed at the mill. It is very important that all tenon gauging he done from these faces. The same is true of the legs or posts, and the slats if there are to be any. To avoid confusion it is well to number each tenon by means of the chisel with a Roman numeral and its corresponding mortise with the same. This will prevent the fitting of one tenon into more than one mortise. Put the parts together with warm glue if it can be had, otherwise use the prepared cold glue. In cold weather the wood ought to be warmed before the glue is applied. Put the ends of the chair together first. When the glue has set on these put the other rails in place. 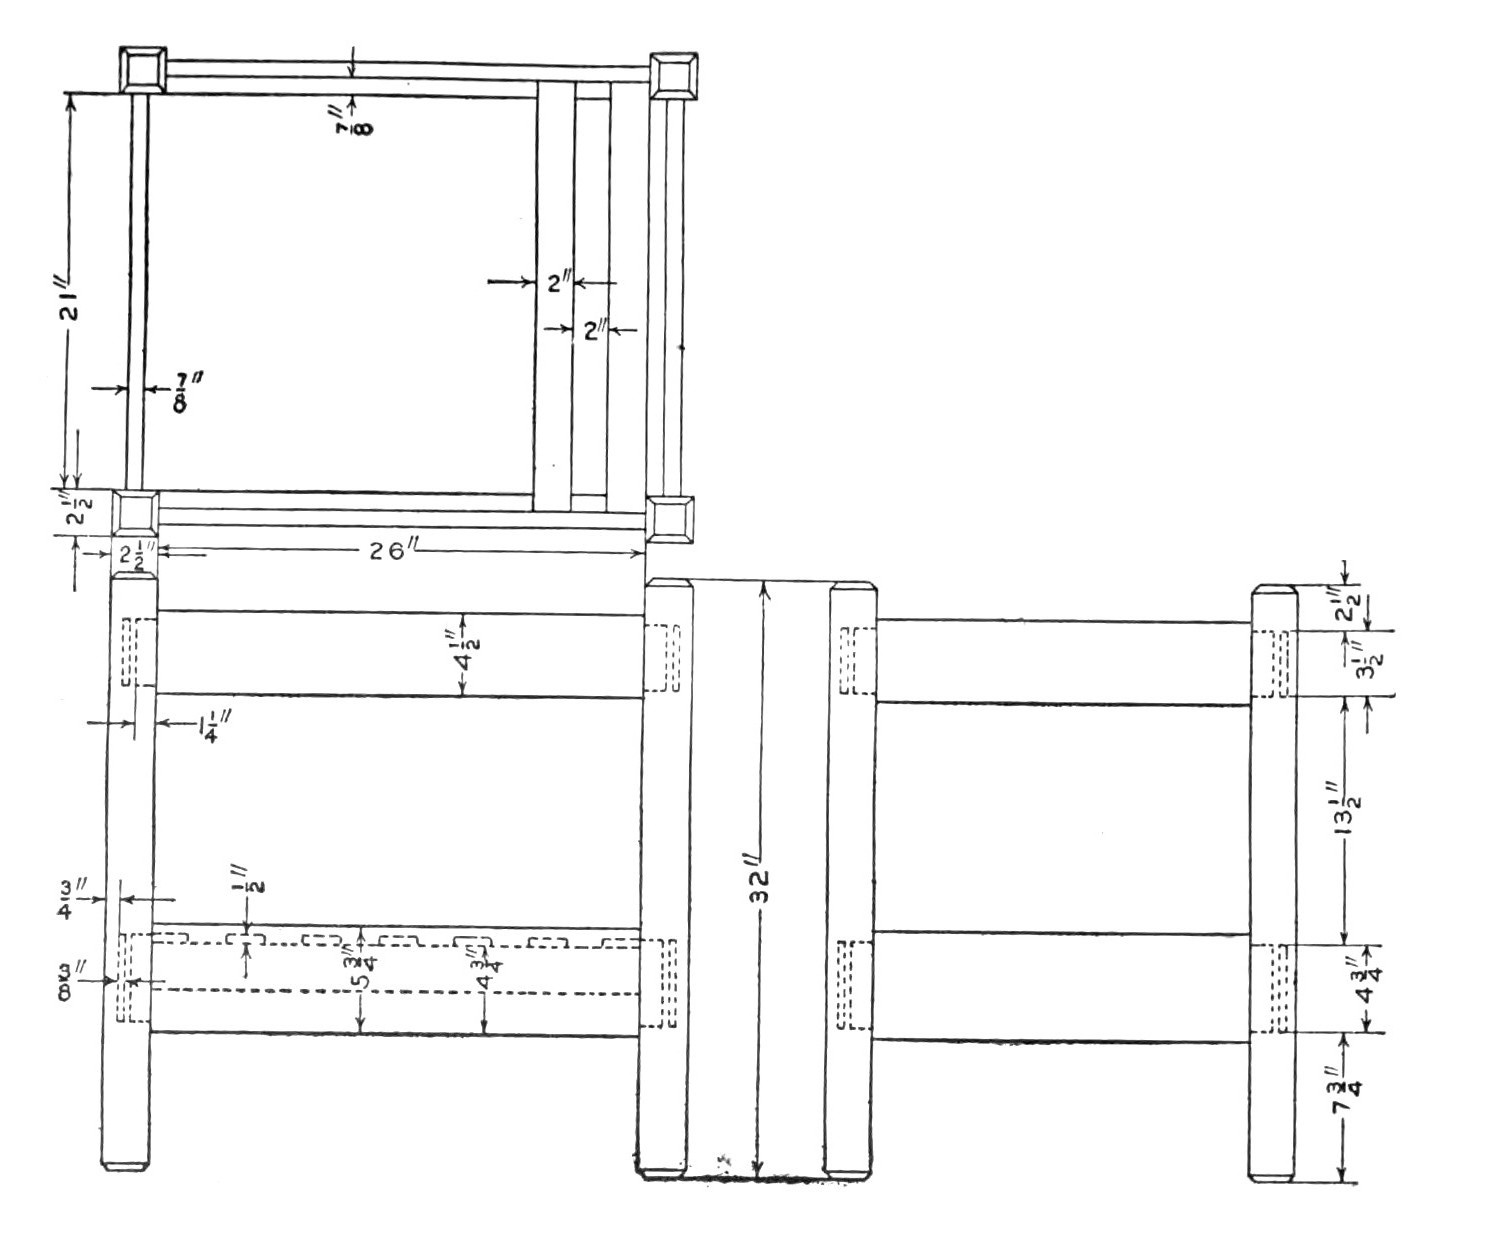 When clamping up the second set of rails make sure the frame of the chair is square. The best way to test for squareness is to measure the diagonals with a stick. Spring the frame until they measure alike, using a brace to hold the frame in position until the glue can harden. Before staining, scrape off any surplus glue, for stain will not adhere to glue and a white spot will be the result of failing to remove it. Fasten cleats to the front and back rails with screws. To these cleats fasten the slats as shown in the drawing. A cushion of Spanish leather, such as is shown in the photograph, can be bought at the furniture store or the upholsterer's. It can be made by the amateur quite easily, however. The two parts are fastened together with leather thongs and the filling is of hair or elastic felt. A cushion for the back might well be provided. To finish the wood to match a brown leather proceed as follows: With a cloth or brush, stain the wood with brown Flemish water stain diluted by the addition of four parts of water. When this has dried, sandpaper smooth, using No. 00 paper held on the tips of the fingers. Apply a dark brown filler. When this has flatted, i.e., when the gloss has disappeared, which will be in the course of ten or fifteen minutes, wipe off clean with excelsior and then with waste or a cloth. Allow this to dry over night, then apply two or three coats of wax. Polish each coat with a flannel cloth by briskly rubbing it. A settle can be made after this design by using longer front and back rails. Rails 42 in. between shoulders will make a good length for a settle.
|
 Click the book image to turn
to the next Chapter.
Click the book image to turn
to the next Chapter.