Web
and Book design,
Copyright, Kellscraft Studio 1999-2016 (Return to Web Text-ures) |
 (HOME)
|
| HOW
TO MAKE A TABOURET Secure
from the planing mill the following pieces and have them planed and
sandpapered on two surfaces: For the top, one piece 7/8 in. thick and
17 in. square. For the legs, four pieces 7/8 in. thick, 4 3/4 in. wide
and 18 1/2 in. long. For the lower stretchers, two pieces 7/8 in.
thick, 2 3/4 in. wide and 15 3/4 in. long. For the top stretchers, two
pieces 7/8 in. thick, 2 1/4 in. wide and 13 1/4 in. long. No stock need
be ordered for the keys, as they can be made out of the waste pieces
remaining after the legs are shaped. Begin
work on the four legs first. While both sides of each leg slope, it
will be necessary to plane a joint edge on each leg from which to lay
out the mortises, grooves and to test the ends. It will be necessary to
have a bevel square to use in marking off the slopes and for testing
them. To get the setting for the bevel square, make a full sized "lay
out" or drawing of the necessary lines in their proper relation to one
another and adjust the bevel to those lines. From the joint edge lay
out the mortises, grooves and the slopes of sides and ends of the legs.
Cut the mortises a n d grooves first, then shape up the sides. Saw the
sides accurately and quite close to the lines, finishing with the steel
cabinet scraper. Next
make the bottom stretchers. In laying out the cross lap joint, the
working faces are both to be up when the joint is completed, therefore
lay off one groove on the face of one piece and on the side opposite
the face on the other. In gauging for depth, however, be careful to
keep the gauge block against the working face of each piece. 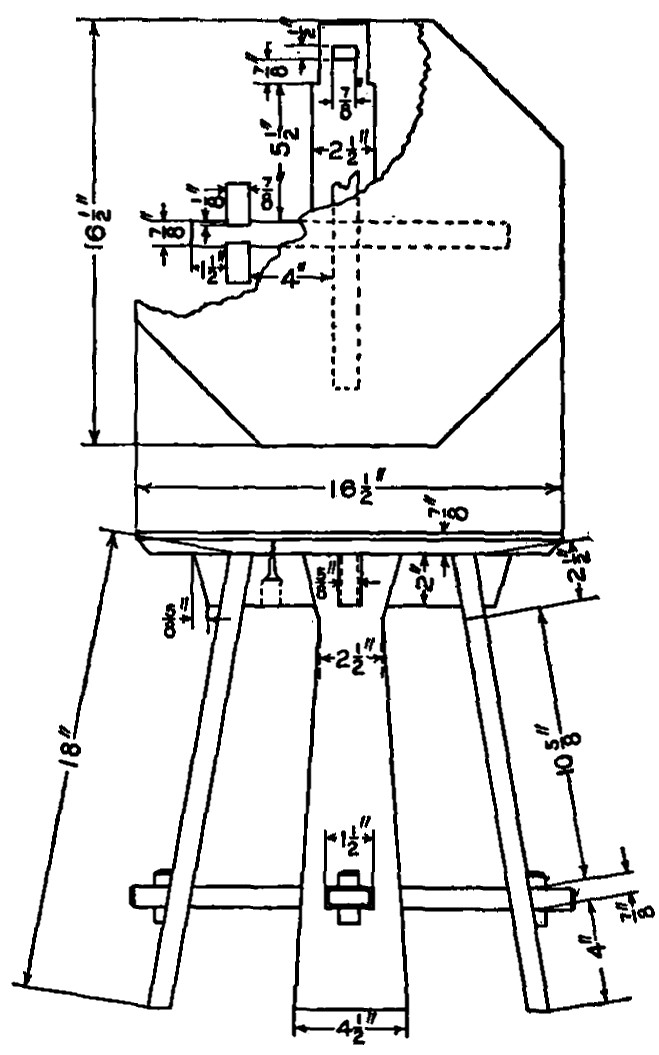 Details of Tabouret In laying out the mortises for the keys, the opening on the top surface is to be made 1/8 in. Longer than on the under surface. The slope of the key will therefore be 1/2 in. of slope to each in. of length. The drawing shows the mortise as 7/8 in. from the shoulders of the tenon. This distance is the same as the thickness of the leg and to insure the key's pulling the shoulder up against the leg firmly, should any of the legs happen to be a little less than 7/8 in., it is well to make the mortise slightly nearer the shoulder than 7/8 in. 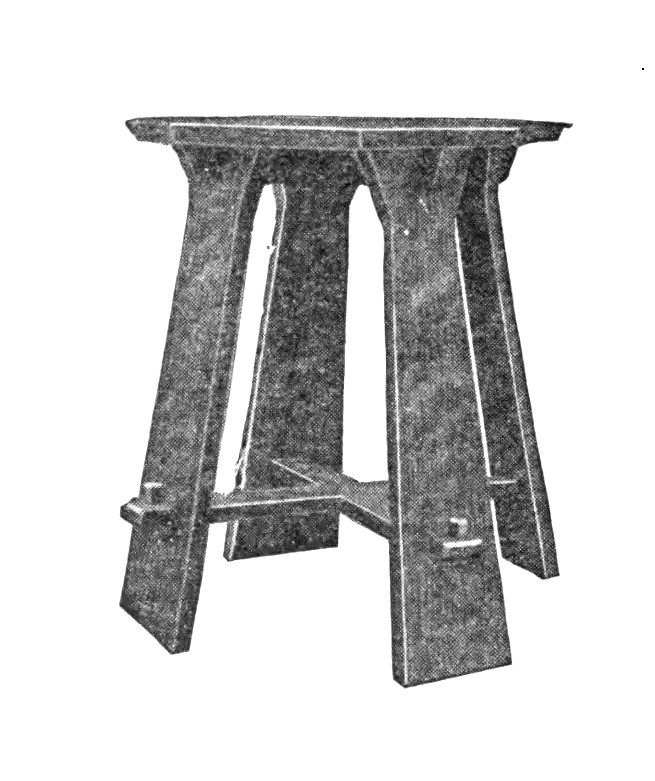 Tabouret as Completed It is a good plan to lay out the mortise in the tenon at the same time the shoulders of the tenons are laid out. Otherwise the joint edge being cut off in making the tenon there is no convenient way to locate this mortise accurately. Lay off the top stretchers according to the dimensions shown in the drawing. Observe the same precautions about the cross lap joint as were given for the lower stretchers, except that the joint edges are to be placed up in this latter case. Make sure the grooves are laid out in the middle before cutting. As a test, place the pieces side by side, examine the markings, then turn one of them end for end and again examine. The grooves into which the legs pass are 1/8 in. deep and must be very carefully cut. Their purpose is to give rigidity to the tabouret frame. Bore two holes in each stretcher for the screws that are to fasten the top in place. Make the keys, scrape all the parts and sandpaper those that were not so treated at the mill. Use glue to fasten the tops of the legs to the top stretchers and assemble these parts. The top is octagonal or eight-sided. To make it, square up a piece to 16 1/2 by 16 1/2 in. Measure the diagonal, take one-half of it and measure from each corner of the board each way along the edges to locate the places at which to cut off the corners. Connect these points, saw and plane the remaining four sides. There is to be a 5/8 in. bevel on the under side of the top. Scrape and sandpaper these edges and secure the top to the stretchers with screws. Much time can be saved and a better result obtained if the wood finishing is done before the parts are put together. Especially is this true if stain and filler are used. A very pretty finish and one easily put on even after the parts are put together is obtained as follows: Take a barrel and stuff up the cracks or paste paper over them so as to make it as near airtight as possible. In some out-of-the-way place put a dish with about 2 oz. of strong ammonia. Set the tabouret over this dish and quickly invert the barrel over the tabouret. Allow the fumes to act on the wood for at least 15 hours. Remove the barrel and allow the fumes to escape. Polish with several coats of wax such as is used upon floors. Directions for waxing will be found on the cans that contain the wax. This produces the rich nut-brown finish so popular in Arts and Crafts furniture and is known as fumed oak.
|
 Click the book image to turn
to the next Chapter.
Click the book image to turn
to the next Chapter.